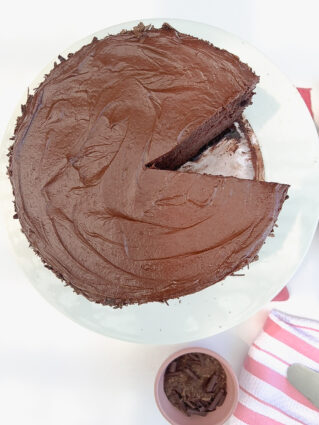
My Go-To Chocolate Cake
A Classic Chocolate Cake with Chocolate Frosting

Dear Mya and Devin,
Making cake for people I love is one of my favorite things to do. Cake at the table means there’s something worth celebrating. It’s communal by nature, no one bakes a cake just for themselves. And I’ve always loved watching something I made become the center of a room, passed from hand to hand, fork to fork.
You both know I usually start by asking what the guest of honor wants. I try to follow their lead, to land on flavors they already love and memories they want to return to. At the same time, there’s always an internal struggle. The engineer in me wants efficiency. The cook wants curiosity. I’m tempted to turn every cake into an experiment—mango-lime curd, miso and sesame, something unfamiliar enough to keep me interested.
And yet, more often than not, the request is simple: chocolate cake. Or better yet, chocolate chocolate cake.
I used to roll my eyes at that. I’d say yes, of course (because I was honored) but part of me resisted making the same thing over and over. Eventually, I learned what every home cook learns, everyone needs a chocolate cake they can rely on. This is that cake. The one you grew up eating at birthday parties. The one people still ask me to make.
Why This Chocolate Cake Is the One I Come Back To
It took repetition for me to understand what this cake was really doing. I made it for 40th birthdays and 50th birthdays, for 3rd and 5th birthdays. The reaction was always the same: pure, uncomplicated joy. I loved watching faces light up, but I loved it even more when your cousins ran up afterward and asked if I’d make the same cake for their birthdays.
Chocolate cake, it turns out, is a great equalizer. It brings together kids and adults, food people and non–food people (who are they, really?), conservatives and liberals, anyone who can agree, at least briefly, on something sweet and familiar. In a divided world, that feels meaningful. This cake doesn’t try to surprise anyone. It shows up, does its job well, and leaves people happy. There’s meaningful power in that.


Where This Recipe Comes From
I didn’t arrive at this chocolate cake recipe quickly. I spent years chasing the version that felt right. Moist but not dense, deeply chocolatey without tipping into bitterness, and sturdy enough to stack without drying out. What finally worked wasn’t a single recipe, but a set of techniques I turned to.
The foundation comes from two bakers I trust: Tessa Huff and Dorie Greenspan. Their cookbooks taught me how structure and tenderness can coexist, how chocolate flavor can be bold without being overwhelming, and how restraint is often the most generous choice. Over time, I blended what I learned from both, adjusting ratios and methods to suit how I bake.
The result is a cake that finds its balance—light yet indulgent, rich but never heavy. It doesn’t ask for attention. It earns it!
What to Know Before You Start
This is a classic chocolate cake, but the details matter.
- Texture goal: tender and fluffy, with a deep chocolate flavor fudgy like a brownie, but lighter and more cake-like
- Batter consistency: very loose and liquid; don’t let that worry you
- Mixing note: unlike most cakes, this batter benefits from being mixed until completely smooth and lump-free
- Structure: sturdy enough to stack
Years of testing taught me that with a high-hydration batter like this one, under-mixing causes more damage than over-mixing. Dry flour pockets turn into tunnels as the cake bakes. Mixing until silky smooth creates an even crumb without risking density, there’s enough moisture here to protect tenderness.
Ingredients
All-Purpose Flour
This cake relies on all-purpose flour for structure. The batter is intentionally loose and liquidy, which gives the cake its moist, tender crumb. Cake flour isn’t the right choice here—it’s better suited to butter cakes where extra tenderness is needed. In this recipe, cake flour simply doesn’t provide enough backbone.
Dutch-Processed Cocoa Powder
Use a high-quality Dutch-processed cocoa for deep, rounded chocolate flavor. Beyond taste, cocoa also plays a structural role in the cake, contributing to its body and balance.
Baking Powder
Provides lift by creating tiny air bubbles as the cake bakes, helping the crumb stay soft and fluffy.
Baking Soda
Works alongside the baking powder to balance acidity especially important when coffee is part of the batter.
Salt
Not optional. Salt sharpens sweetness and keeps the chocolate flavor from falling flat. It’s what makes the cake taste complete.
Oil
Oil keeps this cake moist for days. It coats the flour evenly, limiting gluten development and creating a tender, even crumb. Neutral oils like grapeseed are ideal here.
Sugar
Sugar does more than sweeten, it contributes to structure and lift. As it melts and heats in the oven, it helps create air pockets that keep the cake light.
Eggs + Egg Yolks
Eggs bind everything together and provide structure, while extra yolks add richness and tenderness.
Vanilla Extract
Vanilla rounds out the chocolate flavor and adds warmth. It doesn’t shout, but you’d miss it if it were gone.
Milk
Adds moisture and helps activate the leavening agents, keeping the cake soft and balanced.
Coffee
You won’t taste coffee, but you’ll taste better chocolate. Coffee deepens and intensifies cocoa’s flavor, making the cake taste more chocolatey overall.
Tools You’ll Need
Stand Mixer or Hand Mixer
You can mix by hand, but a mixer makes life easier, especially when creaming and fully emulsifying this batter.
Cake Pans
Aluminum pans are best. They conduct heat evenly, which helps the cake bake level and consistent.
Parchment Rounds
These make unmolding stress-free. If you don’t have rounds, cut parchment to fit your pans.
How to Make This Chocolate Cake
Prep the Pans
I like to use the greasy side of a butter wrapper, or my fingers with a bit of cold butter, to coat the sides and bottoms of the pans. Add a tablespoon of flour, tap it around until evenly coated, then line the bottom with parchment. This extra step guarantees clean release later.
Mix the Dry Ingredients
Sift together the flour, cocoa powder, baking powder, baking soda, and salt. Sifting isn’t about fussiness, it ensures even distribution and helps prevent overdeveloping gluten, which can make the cake tough. A simple strainer and spoon work just fine.
Cream the Butter and Sugar
This step sets the foundation for the cake’s structure. Beat the butter and sugar until light and fluffy. You’re dissolving sugar and incorporating air—both matter. Scrape down the bowl as needed so everything mixes evenly.
Add the Eggs
Lower the mixer speed and add the eggs and yolks one at a time, fully incorporating each before adding the next. Slower mixing here keeps the crumb tight and even.
Add the Vanilla
Mix just until combined. Vanilla is aromatic and delicate thorough, not aggressive, mixing is the goal.
Combine Wet and Dry Ingredients
This batter benefits from confidence. Whisk thoroughly and don’t worry about over-mixing. Each addition should be fully incorporated before moving on. A smooth, lump-free batter prevents tunneling and gives you a uniform crumb.
Divide and Bake
Evenly portion the batter into three prepared cake pans and bake until set. See tips below if you want perfectly even layers.
FAQs, Tips, and Make-Ahead Notes
How Do I Divide the Batter Evenly?
For precise layers, weigh your mixing bowl before adding ingredients. Once the batter is finished, weigh it again, subtract the bowl’s weight, and divide by three. Pour that amount into each pan for even layers every time.
Do I Need Cake Strips?
If you scale up to a larger pan (10 inches or larger), I highly recommend using cake strips—they help the cake bake more evenly. For 8-inch cakes, I don’t consider them essential. That said, if you like a little extra insurance, feel free to use them.
Can I Skip the Coffee?
Absolutely.
- Use buttermilk: No other changes needed, the acidity works with the baking soda.
Can I Make This Cake Ahead?
Yes, and I recommend it. Bake the layers, cool completely, then wrap tightly and freeze. They’ll taste just as good once thawed. For easier frosting, let the layers defrost just until pliable but still slightly chilled, this keeps crumbs under control.