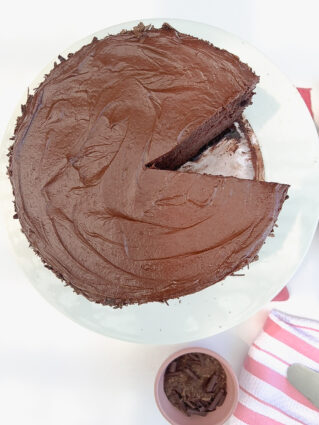
My Perfect Chocolate Layer Cake
 Some cakes are good. Some cakes are great. And then there’s this chocolate cake—a rich, deeply flavored masterpiece that’s tender, fluffy, and perfectly balanced. Every bite melts on your tongue, with just the right amount of sweetness to let the chocolate shine. This is the kind of cake that demands a second slice before you’ve even finished the first.
I spent years chasing the perfect chocolate cake—one that was moist but not dense, bold in chocolate flavor without being cloying, and sturdy enough to stack without being dry. The answer? A blend of tried-and-true techniques, inspired by a combo of cookbook recipes from baking legends Tessa Huff and Dorie Greenspan. The result is a cake that strikes the perfect balance: light yet indulgent, rich yet not overwhelming.
The secret? Learning when to ignore the rulebook. For years, I was told, Don’t overmix! So, I’d stop the second the dry streaks disappeared, only to end up with an uneven crumb. But here’s the truth: mixing the batter until it’s silky smooth and completely lump-free gives you an even, tender texture that brings this cake to the next level.
This isn’t just a cake—it’s an experience. Whether you’re baking for a birthday, a milestone celebration, or just a Tuesday that needs something sweet, this chocolate cake delivers every time. Serve it and watch as it disappears faster than you thought possible. Because some desserts don’t just satisfy a craving—they create moments.


Recipe Ingredients
All-purpose flour – Provides structure for the cake. This batter is very wet and runny, naturally yielding a moist, tender texture. Save cake flour for butter cakes, where added tenderness is needed—cake flour won’t provide enough structure here.
Cocoa powder – Use high-quality Dutch-processed cocoa for a rich, velvety chocolate flavor. It also contributes to the cake’s structure.
Baking powder – Reacts with liquid to create tiny carbon dioxide bubbles, lifting the cake as it bakes for a soft, fluffy texture.
Baking soda – Functions like baking powder but has a higher pH, balancing the acidity of the coffee.
Salt – Enhances sweetness and prevents the cake from tasting flat. A crucial flavor booster that elevates the cake’s layers.
Grapeseed oil – Adds moisture and helps create a tender crumb by evenly coating flour particles, preventing excess gluten development.
Sugar – Sweetens the cake while also acting as a secondary leavening agent. Its moisture creates air bubbles when heated, contributing to a light, fluffy crumb.
Eggs and egg yolks – Bind ingredients and provide structure. Yolks add richness for a more tender cake.
Vanilla – Enhances the chocolate flavor with warm, aromatic depth.
Milk – Adds moisture, helping leavening agents create lift while keeping the cake soft.
Coffee – Deepens the cocoa powder’s richness, enhancing the chocolate flavor for a more decadent result.
Tools
Stand Mixer or Hand Mixer – You can cream the butter and sugar by hand, but a stand mixer saves time and effort. If mixing by hand, be prepared for a workout!
Cake Pans – Aluminum cake pans are best because they conduct heat efficiently, ensuring an even, consistent bake.
Parchment Rounds – Placing these at the bottom of your pan helps the cake release easily. If you don’t have rounds, cut regular parchment sheets to fit.
The How and the Why:
Prep Your Pans – I like to use the greasy side of a butter wrapper or my fingers with a small piece of cold butter to massage the butter into the sides and bottoms of the cake pans. Add a tablespoon of flour, tap it around for even coverage, then place a parchment round inside. Now they’re ready for batter.
Mix Dry Ingredients – Sift together the dry ingredients—flour, cocoa powder, baking soda, baking powder, and salt—allows even distribution and prevents excess gluten formation, which can make the cake tough. Use a strainer over a bowl and gently shake or scrape with a spoon to help it sift through.
Cream Butter & Sugar – This step builds the cake’s light structure and tender crumb. Beat butter and sugar on high speed until light and fluffy, which aerates the dough and dissolves the sugar. Scrape down the bowl periodically to ensure an even texture.
Incorporate Eggs – Lower the mixer speed and add eggs and yolks one at a time, fully mixing each before adding the next. Keeping the speed low prevents excess air from being incorporated.
Add Vanilla – Stir in the vanilla, ensuring it’s evenly mixed without overworking the batter. Vanilla’s aroma dissipates quickly, so balance thorough mixing with minimal agitation.
Combine Wet & Dry Ingredients – Whisk thoroughly to create a smooth, lump-free batter before adding more ingredients. Don’t be overly delicate—each addition should be fully incorporated before moving to the next. This prevents tunneling and ensures an even crumb.
Divide & Bake – Evenly distribute the batter into three prepared cake pans. See my tips below for best results, then bake until done.
Pro Tips
Portioning Batter – To evenly divide batter, start by weighing your wet ingredient mixing bowl before adding ingredients and note its weight. Once your batter is fully mixed, weigh the filled bowl, subtract the bowl’s weight, and divide the total by three. That number is how many grams of batter to pour into each cake pan for perfectly even layers.
Cake Strips – Cake strips help cakes bake evenly by slowing the cooking of the edges, resulting in a more level top. That said, this cake bakes quite evenly on its own—even in a 10-inch pan—so I don’t find them necessary. But if you want to be extra sure your layers stay flat, feel free to use them.
Substituting for Coffee – Not a fan of coffee? Making the cake for kids and don’t want the caffeine? No problem! Swap the coffee for buttermilk or regular milk. If using buttermilk, no other adjustments are needed since its acidity reacts with the baking soda. But if substituting with milk, replace the baking soda with an equal amount of additional baking powder to maintain the proper rise.
Make ahead – Want to get a head start? Bake your cake layers in advance! Once completely cooled, wrap them tightly in plastic wrap and store them in the freezer. They stay fresh and taste just as good as freshly baked once brought to room temperature. When you’re ready to frost, let them defrost slightly—they don’t need to be fully thawed, just not rock-hard. In fact, keeping them a bit chilled makes frosting easier by minimizing crumbs mixing into the frosting.