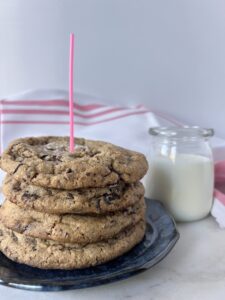
My (almost) Perfect Chocolate Chip Cookie
I’ll probably spend my whole life in pursuit of the perfect chocolate chip cookie—and honestly, I don’t even know what that means. I know its not the towering, doughy masterpieces from Levain Bakery. Or the oversized, melt-in-your-mouth creations from Crumbl. What is the best part of a chocolate chip cookie anyway? The gooey, buttery center? The crispy, golden edges? Or those pockets of melty chocolate?
I’ve had my fair share of good, even great, chocolate chip cookies. But will I ever find “the one”? Probably not. And, much like Hamilton and Angelica, when it comes to chocolate chip cookies – I will never be satisfied.
Still, there’s one cookie I keep coming back to.
Back when I was a new mom, desperate for a little slice of identity beyond diapers and nap schedules, I became obsessed with mastering the ultimate homemade chocolate chip cookie. Fueled by countless sleepless nights nursing and binge-watching Friends (yes, I’m that fan who can quote the entire “Nestlé Tolouse” scene), I decided to “pull a Monica.” I baked my way through every chocolate chip cookie recipe I could find, handing out batches to friends and family for feedback like some sort of crazed chocolate chip scientist.
After countless trials—and plenty of taste-testing—I landed on Jacques Torres’ recipe as my gold standard. Over the years, I’ve made it my own with a few tweaks. For simplicity, I swapped the cake-and-bread flour combo for trusty all-purpose flour. Instead of chilling the dough as one big mass, I scoop it while it’s soft, then let it hydrate for two days. And my favorite tweak – chopping up Trader Joe’s Pound Plus dark chocolate bars instead of using standard chocolate chips. The mix of irregular shards, crumbs, and chunks creates everything from delicate ribbons of chocolate woven through the dough to glorious puddles of molten chocolate in every bite.
Eighteen years later, this is still the cookie I compare all others to. And while my quest for the “perfect” chocolate chip cookie will likely never end (because, really, does perfection exist?), I’ll keep coming back to this one. As they say, it’s not about the destination; it’s about the journey—and with this cookie in hand, what a glorious journey it is.
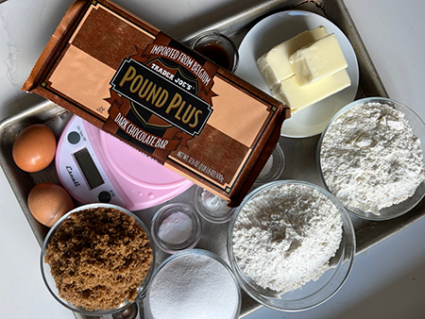
Ingredients You’ll Need
- All-Purpose Flour – The original recipe calls for a mix of cake and bread flour, but after testing, I found that high-quality all-purpose flour (I use King Arthur AP Flour) works just as well. Cake flour creates a tender, fluffy crumb, while bread flour adds chewiness—combining them cancels out their benefits. Since this recipe already leans on the fussy side, I streamlined it with AP flour for simplicity.
- Baking Soda – A leavening agent that helps with spread and browning, giving the cookie a beautifully golden color.
- Baking Powder – Another leavening agent, but this one reacts with liquid to create tiny carbon dioxide bubbles, resulting in a lighter, airier texture.
- Coarse Salt – I always use Diamond Kosher salt for its coarse, irregular crumbles that dissolve evenly in the dough, enhancing every flavor without making the cookie taste “salty.” Instead, it elevates all the other ingredients.
- Butter – Unsalted butter provides that rich, creamy flavor while playing a crucial role in texture and structure. Room-temperature butter is key—it should be soft enough to give slightly when pressed but not too melty. When at the right temp, it dissolves sugars perfectly while also incorporating and holding air. If it’s too soft, the dough turns into a gloopy mess; too firm, and it won’t mix properly. Butter also coats the flour molecules, which limits gluten formation—essential for preventing tough cookies.
- Brown & Granulated Sugar – Sugar does more than add sweetness. It contributes moisture and reacts with leavening agents to create tiny air pockets, giving the cookies crisp edges and a soft, chewy center. As the sugars caramelize in the oven, they undergo Maillard reactions, developing complex toffee and caramel-like flavors.
- Eggs – Act as an emulsifier, binding fats and liquids into a smooth, cohesive dough. They also contribute to leavening by trapping air during baking. The yolks add richness, enhancing the final flavor. For the best texture, use room-temperature eggs so they mix evenly into the dough.
- Vanilla – Just like salt, vanilla enhances all the flavors, adding warmth and aromatic depth.
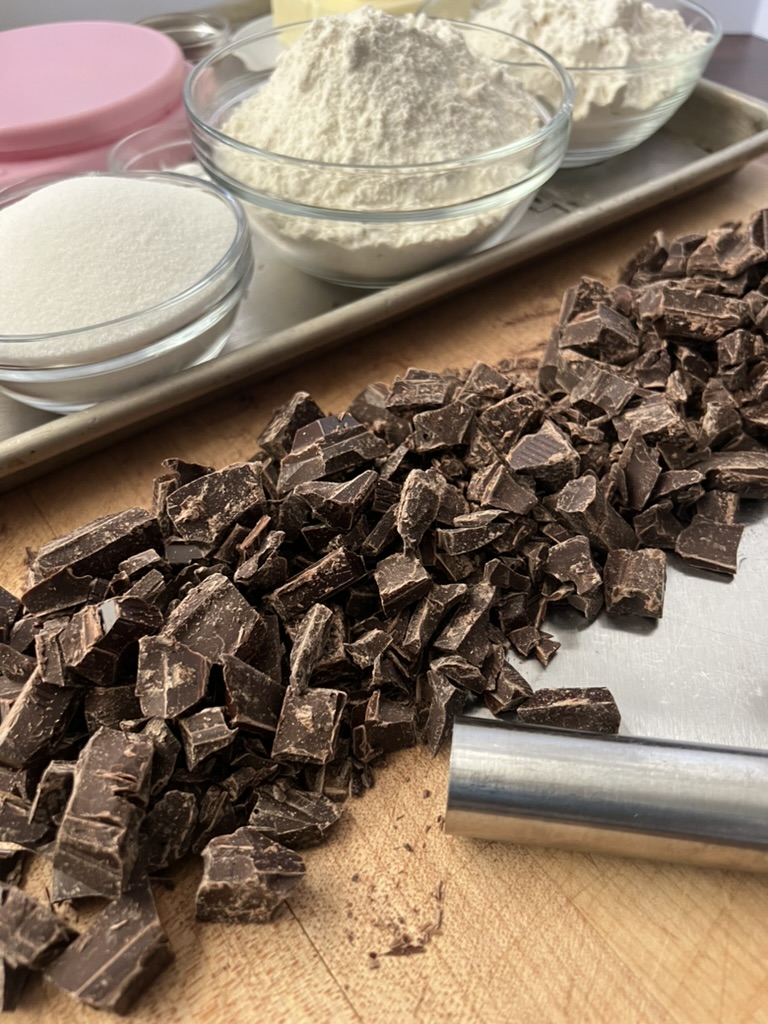
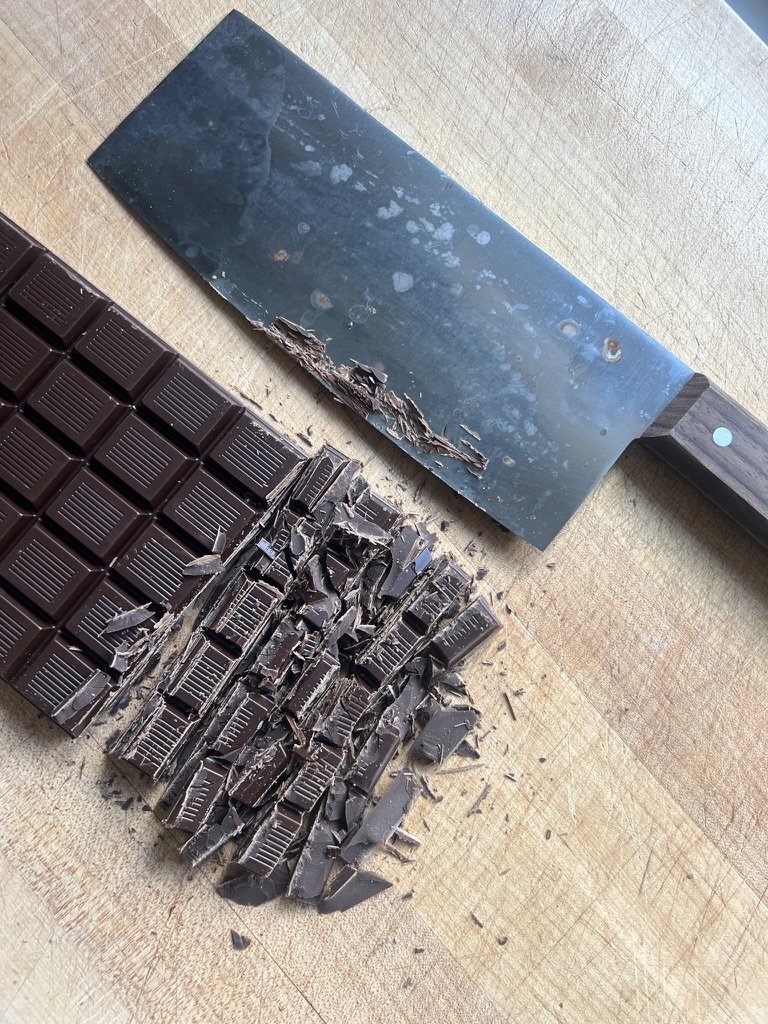
- Chocolate Shards – I swear by Trader Joe’s Pound Plus bars for this recipe—they strike the perfect balance between quality and affordability. Chopping the bar into uneven shards creates a crave-worthy texture variation when baked. Start by slicing the bar into long strips, then make perpendicular cuts for small, irregular chunks (1/4-inch to 3/4-inch). Don’t discard the tiny bits and crumbs—toss them into the dough for extra chocolatey magic.
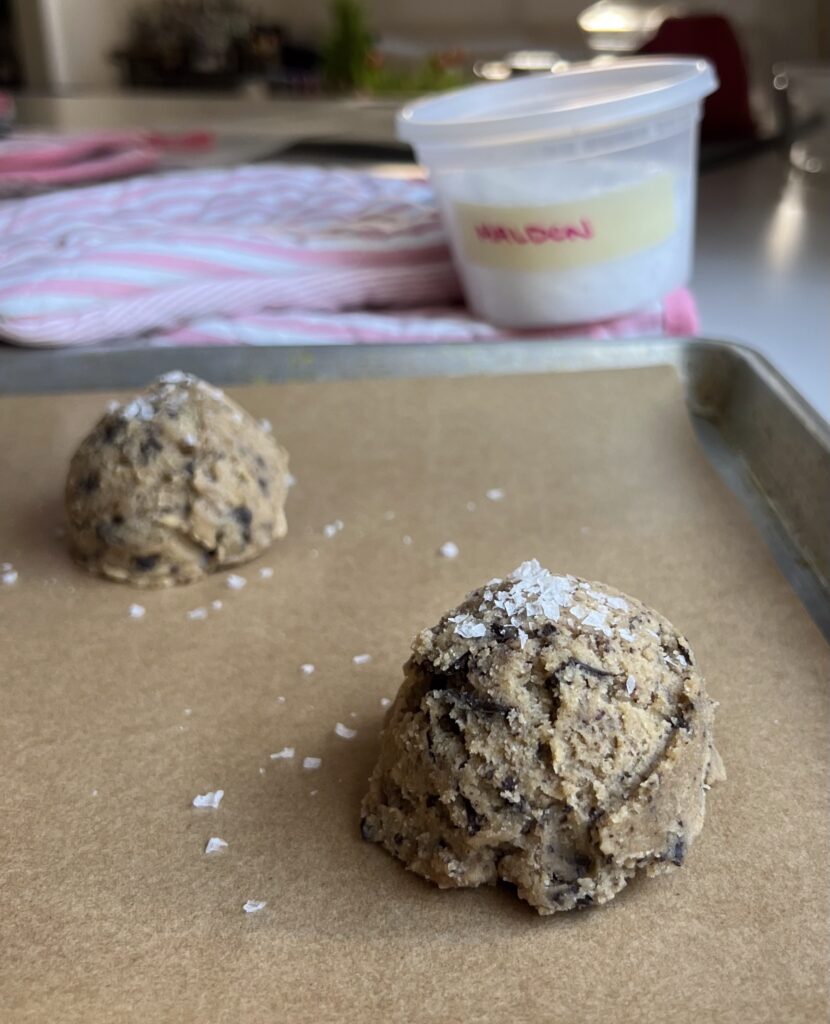
- Flaky Salt – This one’s non-negotiable. Splurge on fancy salts like Maldon or Fleur de Sel if you can; if not, kosher salt works in a pinch. Those big, delicate flakes not only make your cookies look straight out of a bakery but also enhance every bite. As they melt on your tongue, they amplify all the flavors, taking your cookie experience from good to unforgettable.
Tools You’ll Need
- Stand Mixer or Hand Mixer – You can cream butter and sugar by hand, but a stand mixer saves time and effort—especially in the beginning of the process when you’re aiming for a smooth, homogenous texture. If mixing by hand, be ready for a workout!
- Baking Sheets – A good-quality baking sheet ensures even baking. Look for one that’s on the heavier side for even heat distribution, but not so heavy that it’s difficult to lift in and out of the oven. For a detailed breakdown on choosing the best cookie sheets, check out this article by Serious Eats: Best Half-Sheet Pans.
- Parchment Paper – I always keep a box of precut parchment that fits half-sheet trays. I used to buy rolls and cut them to size, but it was frustrating—getting the perfect cut was tricky, the edges were often jagged, and the parchment curled up, requiring counter-rolling to lay flat. Precut sheets fit perfectly, have clean edges (which is incredibly satisfying), and store neatly in a flat box with my sheet trays instead of taking up space in my food wrap drawer.
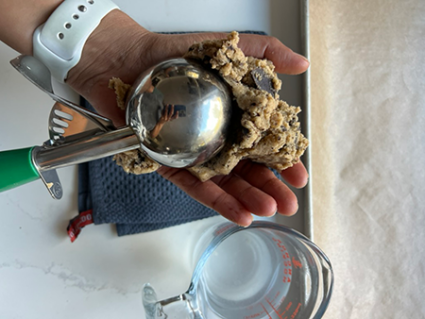
- Cookie Scoop – The magic of these cookies lies in their size. The edges turn crisp and lacy, while the centers stay soft and fudgy. But the best part? That golden ring between the two—slightly chewy, slightly toffee-like, the perfect “money bite.” The only way to achieve that textural contrast is to make them big. Each dough ball should be about 1/3 cup (or 3 oz.), and I use a #12 cookie scoop to ensure uniform size. This way, they bake evenly and need the same baking time.
- Wire Rack – A wire rack is essential for achieving the perfect cookie texture. I know it’s controversial, but I don’t like eating chocolate chip cookies while they’re still warm. The ideal time to enjoy them is once they’re fully cooled—that way, you get the full range of textures. The cookie firms up, but the chocolate stays just a little melty. Transferring cookies to a wire rack allows airflow underneath, crisping them up beautifully. Any wire rack works, as long as there’s enough space for the cookies to cool in a single layer.

How To Details
- Mix Dry Ingredients – Sift together the dry ingredients—flour, baking soda, baking powder, and salt—for even distribution. Use a strainer over a bowl and gently shake or scrape with a spoon, or use a sifter. A whisk can also work, though it’s less effective for even mixing.
- Cream Butter & Sugar – This step dissolves the sugar and aerates the dough, creating tiny air pockets that help lift the cookies as they bake. Beat the butter and sugars on high speed in a stand mixer fitted with a paddle attachment until light and fluffy. Scrape down the bowl periodically to ensure no unmixed butter or sugar remains. This step can take up to five minutes of vigorous mixing—be patient!
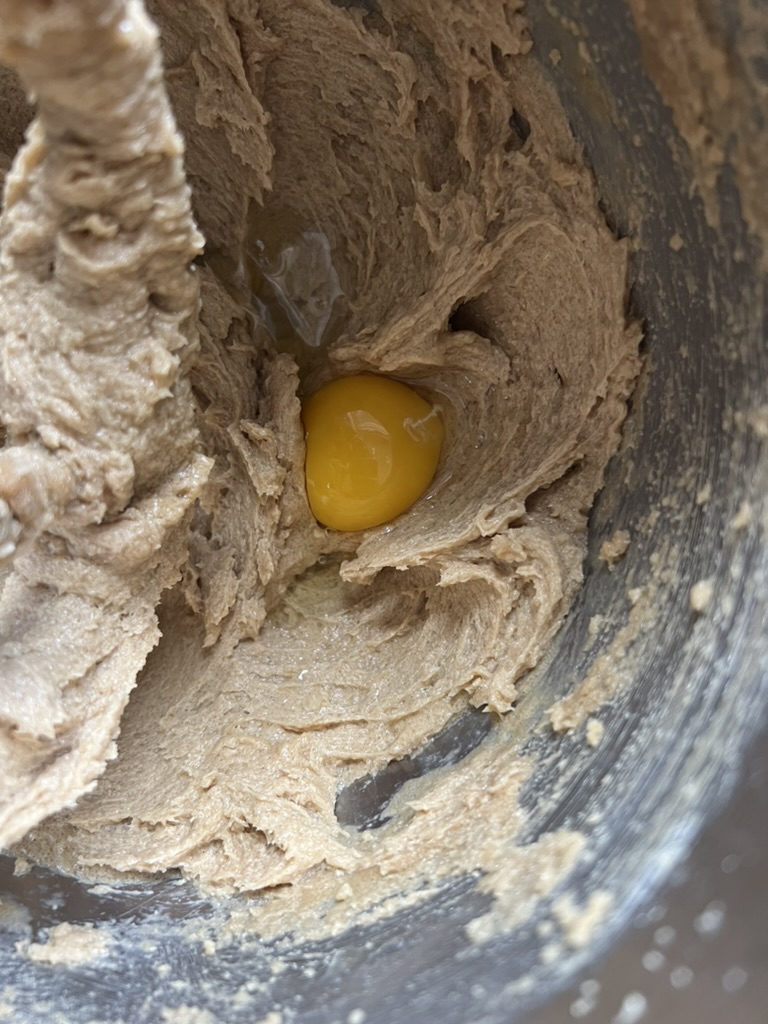
- Incorporate Eggs – Lower the mixer speed to medium and add the eggs one at a time, fully mixing after each addition. The eggs must be fully incorporated without whipping in too much air—too much air leads to cakier cookies, and that’s not what we want. Scrape down the sides after each addition.
- Add Vanilla – Stir in the vanilla at low speed, ensuring even distribution without overmixing. Vanilla’s aroma fades quickly, so balance thorough mixing with minimal agitation.
- Add Dry Ingredients – Add all the dry ingredients at once and mix at low speed just until combined—no dry pockets should remain. Without a plastic guard on your mixing bowl, flour tends to fly everywhere at this stage. To minimize the mess, try gently draping a dish towel around the top of the bowl while mixing. Be careful not to overmix, as this will make the cookies tough, but don’t undermix either—unevenly incorporated ingredients can lead to inconsistent texture.
- Add Chocolate – Add the chocolate chunks all at once and mix at low speed until just incorporated.
- Scoop – As soon as the dough is mixed, scoop it while it’s still soft and pliable. Arrange the scoops on your prepared sheet tray—they can be placed close together at this stage to fit more on a single tray.
- Cure/Age/Hydrate – I know you want to bake these right away, but trust me, waiting at least 24 hours (ideally 48 hours) is worth it. This resting period allows the egg’s moisture to fully absorb into the flour. Because the flour is initially coated by the butter, it takes time for the liquid to work its way in. This process results in a cookie with a more complex, deeply molasses-like, toffee-caramel flavor. The dough also bakes into a darker, more evenly browned cookie with a better texture.
- Storing – After curing, these precious dough balls can be stored in the freezer so you can bake fresh cookies anytime. Let’s be real—there are very few times when an entire batch needs to be baked at once. Bake what you need and freeze the rest, because nothing beats freshly baked cookies. Freeze them on the same sheet tray they’ve been curing on, then transfer them after 12 hours to a gallon-sized ziplock bag for safe storage. I like to label the bag with the oven temp and bake time so I don’t have to look up the recipe later.
- Bake – Finally, it’s time! These cookies bake up huge, so only six will fit on a sheet at a time. Evenly space them on a fresh half-sheet tray lined with parchment paper. Sprinkle with a generous pinch of flaky salt and bake at 350°F for about 18 minutes, just until the edges are barely set and the cookie is evenly golden brown with a slightly puffed center.
- Cool – Let the cookies cool on the baking tray for 10 minutes before transferring them to a wire rack. They will deflate slightly as they cool. Moving them too soon will cause them to fall apart. For the best experience, let them cool at least 30 minutes before eating—this allows the texture and flavors to fully develop. But hey, if you must eat them warm after 10 minutes… I guess that’s acceptable—if you’re into that sort of thing.